I had a DSL static IP account with AT&T for twelve years. My impression has been -- and is now! -- that AT&T treats its static IP customers like 'red-headed stepchildren', as the old saying goes.
As just one example of this: I switched from DSL to U-verse in early May of 2014. Neither before nor after my installation date did I receive any kind of communication from AT&T telling me what my block of static IP addresses were going to be -- the technician (who was great, by the way) had the information scribbled down on a notepad and that's what we used to set up my system!
AT&T sells static IP addresses in different block sizes. These instructions are for setting up a block of 5 addresses, but should be easy to adapt to other block sizes.
AT&T will probably give you a gateway IP address, a useable range of IP addresses, and a netmask. We will use these (bogus) example values in this document:
| Broadcast Address: | xx.xx.xx.39 |
| Gateway IP Address: | xx.xx.xx.38 |
| Useable IP range: | xx.xx.xx.33-37 |
| Subnet IP: | xx.xx.xx.32 |
| Netmask: | 255.255.255.248 |
Note that it takes 8 IP addresses for you to have 5 useable IPs! We won't be using the 'Subnet IP' and 'Broadcast Address' associated with our example block and AT&T probably won't give them to you for your own account. For details about your own (or any other!) subnet, visit this online subnet calculator, and enter the gateway and netmask values given to you by AT&T into the 'IP Address' and 'Subnet Mask' fields. (Network Engineers please feel free to jump in and correct or elucidate as necessary...)
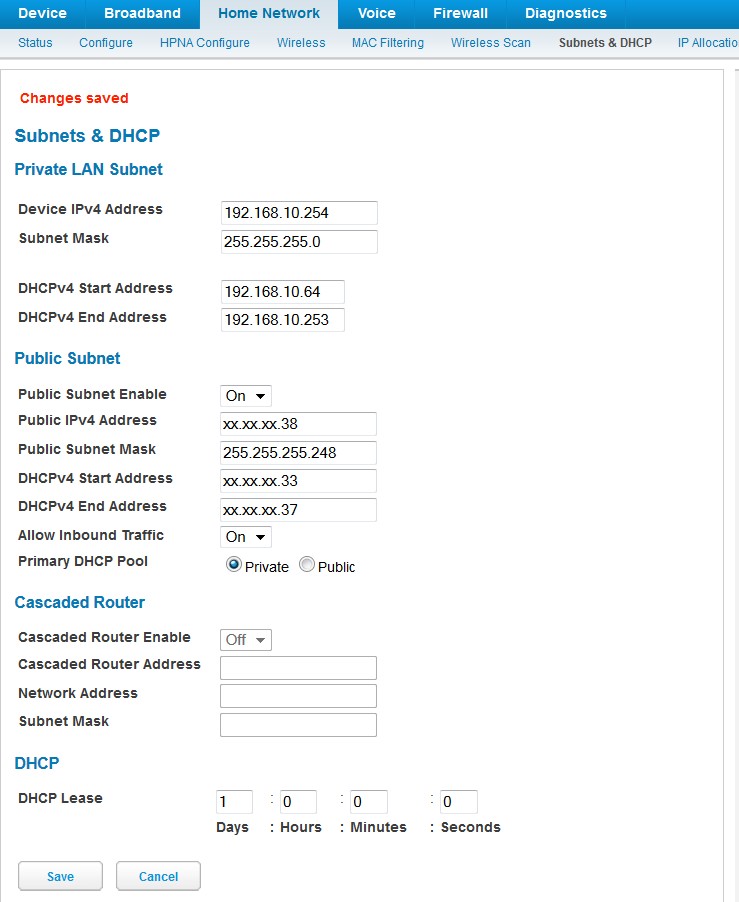
Armed with this information, we will configure the NVG589's 'Subnets & DHCP' settings under the 'Home Network' menu.
The NVG589 uses the 192.168.1.x private class C network scheme. If you have used the same network to configure the LAN on your router, you may want to change the NVG589's default settings so that the two won't clash. You do this on the same setup screen where you enter the static IP values. In my case, I simply changed the third octect from '1' to '10' and left everything else alone, as you will see in the screen shot below.
Browse to your NVG-859 admin page and go to the 'Subnets & DHCP' form under the 'Home Networks' menu.
If necessary, modify the 192.168.1.x IP values in the 'Private LAN Subnet' section.
In the 'Public Subnet' section:
Be sure to get the last setting right. Otherwise the NVG589 DHCP server will dole out your static IP addresses to your cell phones instead of your servers!
Here is a screenshot of the completed form:
Turn off the NVG589 firewall features completely: packet filter, IP passthrough, NAT default server, firewall advanced. Your own router should be taking care of these duties. Or use them in concert with your router, as I describe here.
Configure wireless as you prefer. But do note that any devices connecting wirelessly to the NVG589 will not be visible on the LAN side of your router. I don't use many wireless devices on my LAN, so I set up the NVG589 for wireless-N only and use it for my iPad and cell phones. I have two vintage LinkSys WAP45G wireless-G access points on the LAN side of my router for those occasions when I need them for laptop access.
If you run mail servers that use SMTP, call or chat AT&T and tell them you need port 25 opened on your gateway.
I use a Peplink Balance 20 dual-WAN router with U-verse on one side and Comcast Netfinity on the other. Detailed instructions for configuring the Peplink Balance 20 router are available elsewhere on this site at this link.
Your own router setup will differ, but here is a screenshot of the relevant settings on mine:
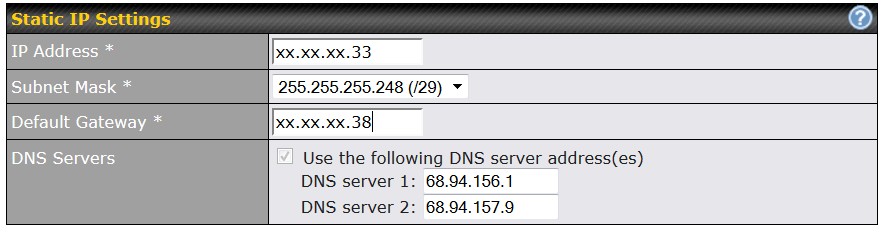
The important thing to note, I believe, is that the NVG589 'Public IPv4 Address' matches the gateway address of the router. On the Peplink, I enter the lowest IP in the NVG589 DHCP range as the 'IP Address' and specify the additional four address elsewhere on a different form. Again, your router will almost certainly differ in its requirements. The table below will hopefully clarify the relationships among the settings between the two devices.
| NVG589 | IP/Netmask | Peplink Balance 20 (or your router) | |
| Public IPv4 Address | xx.xx.xx.38 | Default Gateway | |
| DHCPv4 Start Address | xx.xx.xx.33 | IP Address | Available to your LAN hosts/servers |
| xx.xx.xx.34 | Available to your LAN hosts/servers | ||
| xx.xx.xx.35 | Available to your LAN hosts/servers | ||
| xx.xx.xx.36 | Available to your LAN hosts/servers | ||
| DHCPv4 End Address | xx.xx.xx.37 | Available to your LAN hosts/servers | |
| Public Subnet Mask | 255.255.255.248 | ||
Good luck, and I hope these instructions have helped!
Comments, corrections, questions? Email me here:
![]()